Why You'll Love It
- - Elegant layers that look as good as they taste
- - Creamy vanilla filling that melts in your mouth
- - Simple ingredients, yet a luxurious result
- - Perfect for gatherings or a quiet treat
*"The cream is so smooth, the pastry so crisp – a perfect balance that never disappoints."*
Essential Ingredient Guide
- Puff pastry sheets: Choose high‑quality butter‑based pastry; keep it cold until ready to bake for max lift.
- Vanilla custard: Use real vanilla beans or extract; whisk constantly to avoid lumps.
- Powdered sugar glaze: A light dusting adds a decorative finish without overwhelming sweetness.
- Egg whites: Whipped to soft peaks; they help the custard set gently.
- Lemon zest: A touch brightens the vanilla richness.
- Unsalted butter: Adds depth to the pastry layers and prevents dryness.
Complete Cooking Process
-
Ingredient Readiness:
Measure everything, chill the pastry, and pre‑mix the custard base so nothing surprises you mid‑bake.
-
Flavor Development:
Baking the pastry sheets until golden creates that crucial buttery aroma; simmering the custard builds a silky texture.
-
Texture Control:
Allow each pastry layer to cool completely before stacking; this keeps the layers crisp and the cream smooth.
-
Finishing Touches:
A generous dusting of powdered sugar and a hint of lemon zest give the final visual pop.
-
Serving Timing:
Let the assembled cake rest in the fridge for at least an hour, letting flavors meld and layers set.
- Rotate trays halfway through baking for even color.
- Use a pastry brush to lightly oil each sheet before baking.
- Trim edges with a serrated knife for a clean look.
- Cover the cake loosely with parchment while chilling to prevent drying.
Pro Tips
Well, those little adjustments can make a big difference. I remember once forgetting to rotate the trays and ending up with a slightly uneven top – oops! A gentle hand and a watchful eye keep the layers looking pristine. Also, when you dust the sugar, take a moment to admire the snow‑like finish; it’s part of the ritual.
The essence of the dish:
A fun fact or historical angle:
Flavor or sensory focus:
You Must Know
- Keep pastry chilled until the last moment
- Do not over‑beat the custard
- Allow full cooling before stacking
Frequently Asked Questions
→ Can I make this cake ahead of time?
Yes, assemble the cake a day before, keep it refrigerated, and add the final sugar dusting just before serving.
→ Do I need a professional oven for the puff pastry?
Not at all – a conventional home oven works fine; just preheat properly and watch the color.
→ What can I substitute for vanilla extract?
Real vanilla beans give the deepest flavor; split a bean and scrape the seeds into the custard.
→ How long does the cake stay fresh?
Stored in an airtight container, it remains fresh for 3‑4 days in the fridge.
→ Can I use a gluten‑free pastry?
Absolutely – choose a high‑quality gluten‑free puff pastry and follow the same baking steps.
→ Is the cake suitable for diabetics?
You can reduce powdered sugar in the glaze and use a sugar substitute in the custard; it will still be delightful.
Chef's Tips
If the pastry sheets shrink, gently roll them out with a rolling pin before baking.,Use a metal spatula to spread the custard evenly; it helps keep layers uniform.,A light drizzle of melted butter on each baked sheet adds extra shine.
Nutrition Facts
per serving
420
Calories
6g
Protein
42g
Carbs
22g
Fat
Taste Profile
Buttery, sweet, and lightly aromatic
Ingredient Substitutions
Don't have an ingredient? Try these alternatives
Will slightly alter the richness; use a splash of extra cream to compensate.
Mix with a little cold water to avoid lumps; results in a smoother custard.
Recipe Variations
Try these delicious twists on the original
Spicy Version
Add a pinch of ground cardamom to the custard and a light dusting of cinnamon on top.
Mediterranean Style
Incorporate a thin layer of honey‑sweetened ricotta between pastry sheets, and garnish with toasted pistachios.
Common Mistakes to Avoid
Learn from others' mistakes for perfect results
- Over‑baking the pastry leads to a hard, dry layer.
- Skipping the cooling step causes the custard to seep into the pastry.
- Using lukewarm butter when brushing pastry can prevent puffing.
Meal Prep & Storage
Make Ahead Tips
You can bake the pastry sheets a day ahead and keep them in an airtight container; the custard can be prepared up to 12 hours ahead and refrigerated.
Leftover Ideas
Reheat gently in a low oven (150°C) for 5‑7 minutes; the pastry will regain some crispness without drying the cream.
Perfect Pairings
Serve this with...
Cooking Timeline
Preheat oven, prepare parchment, and set out pastry sheets.
Brush and bake each pastry sheet, rotating trays halfway.
Heat milk and cream, whisk egg yolks, sugar, and flour together.
Temper egg mixture, cook custard to thickened stage, then cool.
Assemble layers, alternating pastry and custard.
Chill assembled cake, dust with powdered sugar before serving.
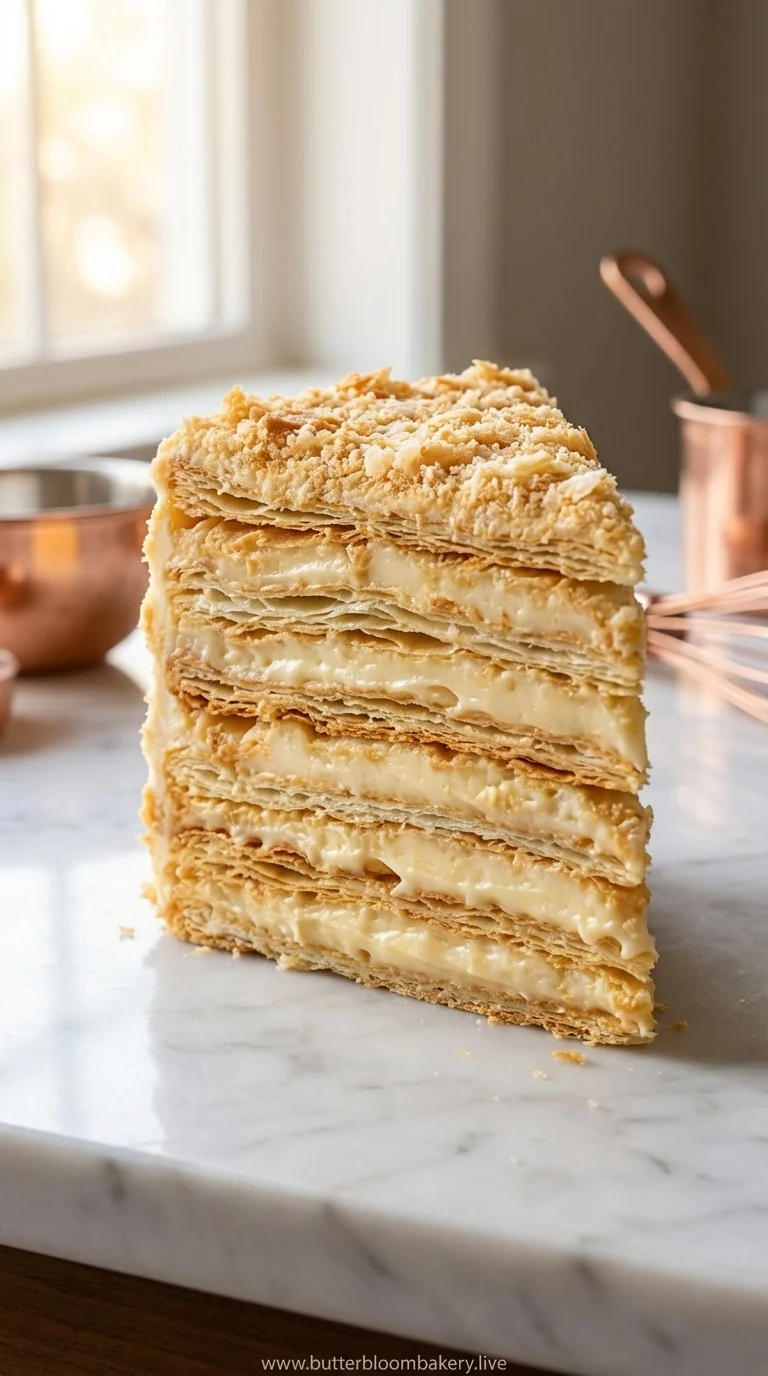
Russian Napoleon Cake – Classic Puff Pastry Dessert
Layers upon layers of buttery puff pastry, crisp and golden, alternate with a silky vanilla cream that whispers of sweet nostalgia. This classic Russian Napoleon Cake feels like a quiet celebration on a plate, inviting you to savor each delicate bite.
Timing
Prep Time
30 Minutes
Cook Time
45 Minutes
Total Time
1 Hour 15 Minutes
Recipe Details
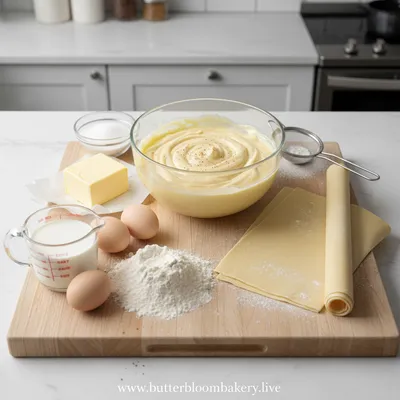
Ingredients
Puff Pastry
- 01 6 sheets frozen puff pastry, thawed
- 02 2 tbsp melted butter, for brushing
Vanilla Cream
- 01 2 cups whole milk
- 02 1 cup heavy cream
- 03 4 egg yolks
- 04 1/2 cup sugar
- 05 2 tbsp all‑purpose flour
- 06 1 tsp vanilla extract
- 07 Zest of 1 lemon
Finishing
- 01 Powdered sugar, for dusting
- 02 Fresh berries, optional
Instructions
Preheat the oven to 200°C (400°F). Line a baking sheet with parchment.
Place one sheet of puff pastry on the sheet, brush lightly with melted butter. Bake for 12‑15 minutes until golden and puffed. Cool completely on a wire rack. Repeat with remaining sheets.
In a saucepan, heat milk and cream until just simmering. In a bowl, whisk egg yolks, sugar, and flour until smooth.
Temper the egg mixture by slowly whisking in a ladle of the hot milk mixture. Then pour the tempered mixture back into the saucepan.
Cook over medium heat, stirring constantly, until the custard thickens and bubbles. Remove from heat, stir in vanilla extract, lemon zest, and let cool.
Lay the first pastry sheet on a serving platter, spread a thin layer of custard, repeat layers, finishing with a pastry top.
Refrigerate the assembled cake for at least 1 hour to set. Dust with powdered sugar just before serving and garnish with berries if desired.
Notes & Tips
- 1 If the pastry sheets shrink, gently roll them out with a rolling pin before baking.
- 2 Use a metal spatula to spread the custard evenly; it helps keep layers uniform.
- 3 A light drizzle of melted butter on each baked sheet adds extra shine.
Tools You'll Need
-
Oven
-
Baking sheet
-
Parchment paper
-
Saucepan
-
Whisk
-
Rolling pin
-
Serrated knife
-
Wire rack
Must-Know Tips
- Do not over‑bake the pastry; watch for a light golden hue.
- Let custard cool completely before spreading to avoid soggy layers.
- Chill the assembled cake; it lets flavors meld and makes slicing easier.
Professional Secrets
- Cold butter in the dough creates steam pockets for lift.
- Gentle simmering avoids curdling the custard.
- Refrigerate the cake overnight for the most cohesive texture.

Recipe by
Amelia HartChef Amelia Hart is a talented cake designer who loves creating beautiful celebration cakes for special moments. She specializes in layered cakes, cre ...
Get Delicious Recipes Weekly
Join 25,000+ home cooks getting our best recipes straight to their inbox.
Free forever • No spam • Unsubscribe anytime